1. Pin Backs and Hardware: The Foundation of Every Good Display
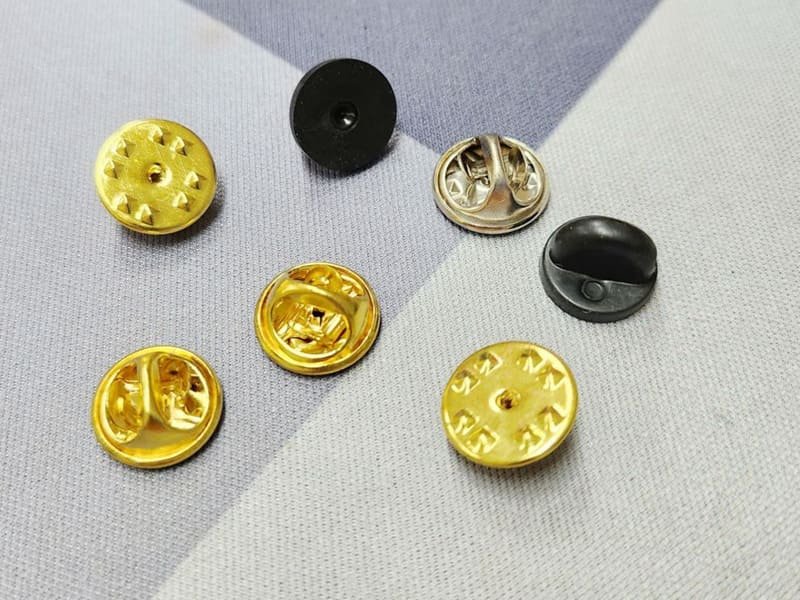
Before you push a single pin into a wall, board, or jacket, you must understand the hardware on the reverse side. Every pin features a sharp metal post, but the clasp you choose dictates whether your pin stays firmly in place or ends up lost forever. Using the wrong pin back on a moving bag can cause your favorite pin to pull free, while using an overly bulky clasp on a flat frame can warp your backing board.
Comparing Pin Back Mechanisms
Collectors and manufacturers utilize several distinct types of pin clutches. Selecting the proper backing ensures a snug fit, smooth alignment, and total security:
- Black Rubber Clutches: These are the standard industry favorites. Rubber clutches grip the post tightly through natural friction and sit comfortably against skin or display boards. Because they are soft, flexible, and low-profile, they are the best option for stationary wall boards, embroidery hoops, and felt frames.
- Butterfly (Military) Clutches: Crafted from stamped metal with two small squeeze prongs, these classic backs lock onto small grooves on the pin shaft. While lightweight and traditional, their metal wings can bend over time, making them less secure for active movement.
- Push/Pull Deluxe Locking Backs: These spring-loaded cylindrical clasps slide onto the post and lock automatically without requiring any tools. To release the pin, you simply lift the top cap. They offer unmatched security for everyday wearables like coats, backpacks, and conference lanyards.
- Allen-Key / Screw Locking Backs: Utilizing a tiny set screw tightened with a miniature wrench, these locks provide a permanent, tamper-proof grip. They are ideal for heavy luggage or denim vests where you never plan to move the pin.
- Magnetic Pin Backs: Flat magnetic clutches attach directly over the pin post without requiring you to pierce your fabric twice. They allow you to mount pins on refrigerators, dry-erase whiteboards, or delicate silk and cotton blouses without leaving puncture holes.
- Felt Buffer Discs: When attaching heavy pins to thin fabrics or banners, sliding a tiny felt or cardstock disc over the post before locking the clutch distributes the weight evenly. This simple buffer stops thin fabrics from sagging or tearing under the pin’s weight.
| Clutch Type | Primary Display Use | Security Level | Tool Required? | Fabric / Board Impact |
|---|---|---|---|---|
| Rubber Clutch | Corkboards, Wall Frames, Hoops | Moderate | No | Gentle & Low Profile |
| Butterfly Clutch | Bulletin Boards, Shadow Boxes | Standard | No | Metal prongs may scratch backings |
| Push/Pull Locking | Jackets, Backpacks, Lanyards | High | No | Zero fabric pull, ultra-secure |
| Screw-Lock Clutch | Heavy Vests, Travel Luggage | Maximum | Yes (Hex Wrench) | Permanent lock, heavy profile |
| Magnetic Back | Fridges, Whiteboards, Fine Silk | Firm Hold | No | Zero puncture holes in fabric |
2. Classic Wall Displays: Corkboards and Modern Board Alternatives
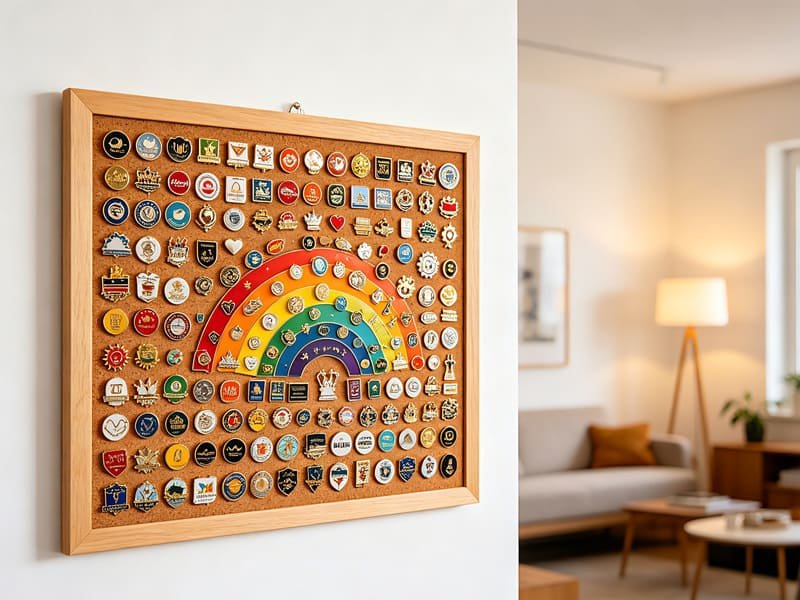
The traditional corkboard remains the undisputed king of enamel pin displays. It is budget-friendly, widely available, and exceptionally easy to customize. When you insert a pin into dense cork, the natural elasticity of the material grips the post firmly without requiring you to attach a backing clutch behind the board. This allows you to rearrange, expand, and reorganize your pins in seconds.
Standard Framed Corkboards
Standard framed corkboards from hobby or office supply shops give you an immediate, ready-to-use display straight out of the box. Available in dimensions ranging from compact 8×10-inch desktop boards to expansive 36×48-inch wall panels, they offer vast surface area. For a clean look, paint the outer wooden frame in a matte black, crisp white, or bold accent tone that complements your interior decor.
The Grid Corkboard (The Trader’s Favorite)
If you regularly trade, photograph, or sell pins on online forums and message boards, pointing out individual pins can be frustrating. A grid corkboard solves this problem instantly. By drawing a neat grid of 1-inch or 2-inch squares across your cork surface with a fine paint pen, you create clear coordinates. You can easily reference “row three, column two” when showing off your pieces in photos.
Stenciled and Painted Thematic Corkboards
Why settle for plain brown cork when you can turn the board itself into a canvas? Using acrylic paint and craft stencils, you can add charming patterns behind your collection:
- Botanical & Leaf Patterns: Soft green foliage stencils provide an earthy, natural backdrop for floral and animal pins.
- The World Map Backdrop: Paint or stencil a world map across the cork. Whenever you travel to a new city or country, push your souvenir travel pin directly into that geographical location on the map.
- Geometric Color Blocking: Use painter’s tape to divide the cork into sharp diagonal zones of pastel or vibrant colors, giving modern pins an artistic, gallery-style look.
Custom-Cut Specialty Cork Shapes
Because cork is soft and pliable, you do not have to limit yourself to rectangular boards. Crafting custom silhouettes is surprisingly simple with a sharp utility knife and dense cork sheets (ensure your cork is at least 8mm thick so pin posts do not poke through to the wall):
- Disney Mouse-Ear Silhouettes: Cut cork into the iconic rounded-ear silhouette for theme-park trading collections.
- Crescent Moons & Stars: Cut out a sleek crescent moon shape to showcase celestial, occult, or space-themed pins.
- Monstera Leaves & Botanicals: Trace tropical leaf templates onto cork for nature collections.
- Hexagon Wall Tiles: Group modular cork hexagons together across your wall, dedicating each separate hexagon tile to a specific fandom or color palette.
Next-Gen Fabric Boards: Stick’N’Go® Panels
For collectors who want a modern look without the traditional cork texture, specialized boards like PinFolio Stick’N’Go® wall panels provide a breakthrough solution. These boards use dense, self-healing fabric layers that secure pin posts instantly without any backings. Because the fabric closes back up when a pin is removed, the board never shows unsightly pin holes, ensuring your display always looks brand new even after hundreds of layout changes.
| Display Board Material | Cost Level | Rearrange Ease | Durability / Pin Holes | Best Fit For |
|---|---|---|---|---|
| Natural Cork | Very Low | Instant & Effortless | Self-healing, highly durable | General collections & beginners |
| Fabric-Covered Foam | Low | Easy | Punctures may show over time | Color-themed aesthetic boards |
| Stick’N’Go® Panels | Moderate | Instant (No backs needed) | Zero visible holes, pristine surface | High-end, frequently updated sets |
| Laser-Cut Wood | Moderate to High | Requires pre-drilled holes | Permanent, rigid structure | Minimalist & branded desktop displays |
3. Elegant, Enclosed, and Museum-Style Displays: Shadow Boxes & Frames
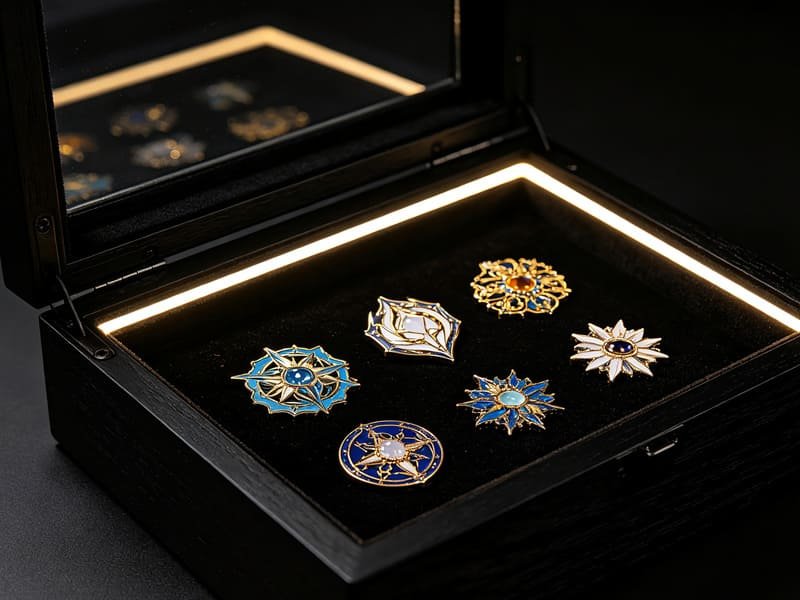
If your pin collection contains limited-edition releases, valuable collectibles, or sentimental keepsakes, open-air boards can expose them to airborne dust, accidental bumps, and surface oxidation. Shadow boxes and enclosed display frames offer the ultimate blend of elegance, security, and long-term protection.
The Advantages of Deep Shadow Boxes
Unlike standard picture frames where the glass rests directly against the artwork, a shadow box features an interior depth of 1 to 2 inches. This gives pin posts, raised 3D metal castings, and moving spinner mechanisms plenty of room to breathe behind a clear glass or acrylic window. Most shadow boxes include a foam core or cork substrate lined with felt, linen, or black velvet. When latched closed, the front pane shields your pins completely from dust, curious pets, and airborne moisture.
Illuminated & LED Lighted Shadow Boxes
Want to turn your pin collection into a dramatic nighttime feature? Installing battery-operated or USB-powered micro LED strip lights along the inner perimeter of your shadow box creates a brilliant glowing showcase. The direct light catches the polished gold, silver, and black nickel metal lines, making glitter and translucent enamel elements sparkle like fine jewelry. For music and concert pins, backlighting mimics an energetic stage performance, while glow-in-the-dark tubing creates an electric neon atmosphere.
Double-Matted Picture Frames
You can also convert standard art frames into high-end pin showcases using double matting. By cutting two coordinating mat boards—such as a crisp white outer mat paired with a thin gold or black inner core—you frame your pins as fine art. Thick backing foam holds the pins firmly against the mat board without putting pressure on the outer glass.
Step-by-Step DIY Tutorial: The 10-Minute Framed Pin Board
You do not need expensive workshop tools to build a beautiful framed pin display. Using a repurposed photo frame from a charity shop or local craft store, you can build this custom display in just ten minutes (inspired by the classic Jubly-Umph craft recipe):
“Repurposing an old picture frame with foam core and decorative cardstock gives forgotten pins a bespoke, gallery-worthy home in under ten minutes.”
- Gather Your Tools & Materials: You will need an empty picture frame, a sheet of 5mm foam core board (or corrugated cardboard/corflute), decorative scrapbook paper (or linen fabric), a utility knife, a ruler, a cutting mat, and double-sided tape or spray adhesive.
- Measure and Trace: Remove the glass from your frame (you will not need the glass for this open-face project). Place the frame’s original backing board onto your foam core and trace its exact perimeter with a pencil.
- Cut the Base Insert: Using your utility knife and ruler on a cutting mat, cut carefully along your pencil line to create your foam backing insert.
- Adhere Your Decorative Surface: Cut your decorative cardstock or fabric roughly 1 inch larger than the foam core. Apply a smooth layer of spray adhesive or double-sided tape across the foam core face, align your paper/fabric, and press firmly from the center outward to eliminate air bubbles. Fold the excess material over the edges and secure it on the back.
- Assemble and Pin: Drop your newly upholstered insert into the frame, fold down the metal retaining tabs on the back, and place your frame on a desk easel or hang it on the wall. Push your favorite pins straight into the foam surface in your chosen pattern!
Curio Cabinets & Museum-Grade Lockable Cases
For serious collectors holding fifty to hundreds of valuable pins, large wall-mounted curio cabinets offer the gold standard. Featuring solid wood construction, felt-lined interior shelves, hinged locking glass doors, and built-in UV-filtering panes, these cases keep entire collections organized, secure, and pristine for generations.
4. Fabric, Textile, and Craft Displays: Hoops, Banners, and Tapestries
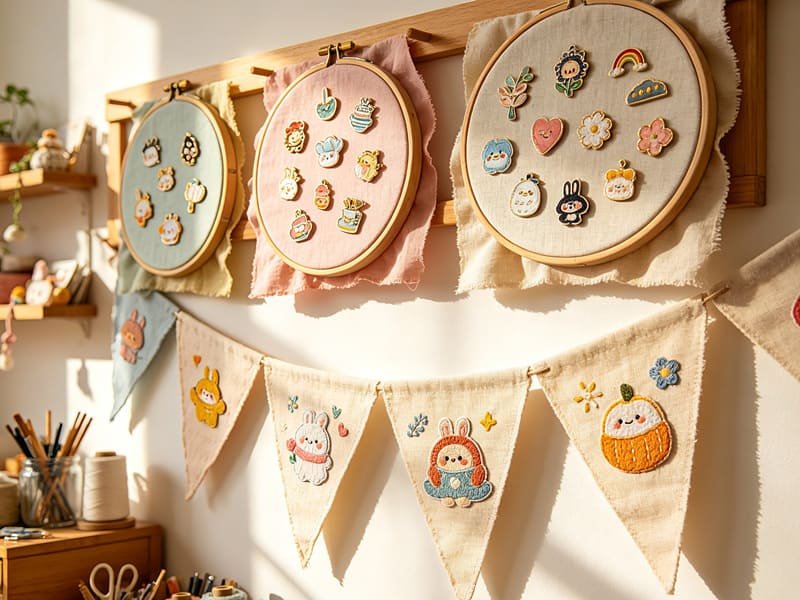
If you love cozy textures and handmade charm, fabric displays offer an endless canvas for creativity. Unlike rigid boards, textiles bring warmth, movement, and tactile softness to your living space. They are lightweight, effortless to hang, and gentle on pin posts.
The Embroidery Hoop Pin Display
Embroidery hoops are designed to hold fabric under drum-tight tension, making them an ideal, low-cost structure for holding heavy enamel pins. By grouping several hoops of different sizes (such as 6-inch, 8-inch, and 12-inch rings), you can create an eye-catching, modular gallery wall.
Step-by-Step No-Sew Embroidery Hoop Tutorial
Follow this simple method (adapted from the popular Diary of a Quilter technique) to create a tailored hoop display in fifteen minutes:
- Select Your Fabric and Hoop: Choose a sturdy woven linen/cotton blend or wool felt, along with a 10-inch to 14-inch wooden embroidery hoop.
- Reinforce the Fabric: Cut a piece of iron-on fusible interfacing (such as Shape Flex 101) to match your fabric size. Iron it onto the reverse side of your fabric. This added backing gives the cloth enough strength to hold heavy metal pins without sagging.
- Hoop and Tension: Separate the outer and inner wooden rings. Lay your fabric over the inner ring, press the outer ring down, and tighten the brass screw at the top while gently pulling the fabric edges until it is drum-tight.
- Trim and Glue: Flip the hoop over. Trim the excess fabric, leaving roughly 1 inch of border. Run a thin bead of hot glue along the inside wooden rim, fold the fabric edge over, and press it firmly in place.
- Personalize: Customize your hoop by painting the outer wooden ring, adding an iron-on vinyl quote, or stitching simple decorative border details with embroidery floss. Push your pins through the fabric and secure their rubber clutches on the back.
Hanging Pin Banners and Pennants
Hanging canvas banners and pennants have become a massive trend across the pin-collecting community. Suspended from a natural wooden dowel with a simple cotton cord, banners provide a vertical display that fits narrow wall spaces, doors, or cubicle dividers. You can choose neutral unbleached canvas to make colorful pins stand out, or select rich black felt, playful celestial prints, or pom-pom fringe borders. Banners also excel at displaying mixed collections that combine enamel pins with iron-on embroidered patches.
Large Wall Tapestries, Burlap, and Repurposed Rugs
When your collection grows into the hundreds, small banners can quickly run out of room. Lightweight wall tapestries offer massive surface area without requiring heavy wall anchors. Bohemian patterned tapestries, rustic burlap wall hangings, flat-weave Turkish rugs, and vintage fabric maps can all be pinned directly with your collection, turning an entire wall into a breathtaking tapestry of art.
5. Tabletop, Desk, and 3D Creative Displays
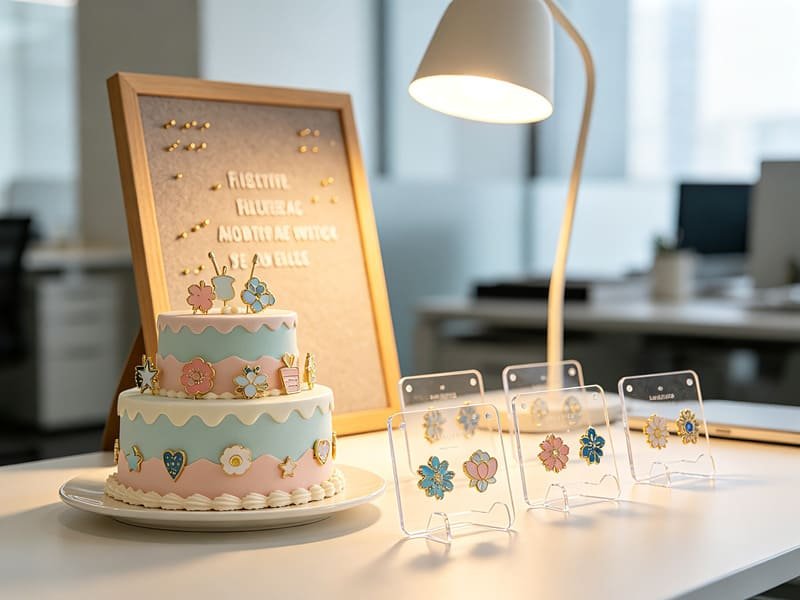
Not all displays belong on a wall. If you spend long hours working at a computer or want to keep your favorite pieces close at hand, tabletop and freestanding 3D displays add delightful personality to desks, bookshelves, and nightstands.
Minimalist Acrylic and Wooden Pin Stands
Individual acrylic stands are specifically engineered to hold single statement pins. Featuring tiny pre-drilled holes or precision grooves, they support the pin upright in a floating, minimalist posture. Clear acrylic pedestals let the pin design take center stage without visual distraction, making them perfect for desks, curio shelves, or retail display counters.
Repurposed Miniatures and Diorama Settings
One of the most imaginative display ideas involves using miniature dollhouse furniture and diorama sets (a trend popularized by creative collectors on Instagram). By pinning fantasy or pop-culture pins inside a tiny dollhouse bookcase, behind a miniature wooden desk, or under an operational micro reading lamp, you turn your pins into the centerpiece of a tiny storybook world.
The Faux 3-Tier Cake Display (Brite & Bubbly DIY)
For food, dessert, and pastel-themed collections, building a faux multi-tier cake stand is an unforgettable project:
- Stack three round Styrofoam cake dummies (e.g., 8-inch, 6-inch, and 4-inch tiers) and glue them together.
- Coat the exterior with lightweight spackling paste tinted with pastel pink or mint acrylic paint to create realistic “frosting,” or wrap each tier tightly in satin fabric.
- Once dry, push your dessert and character pins directly into the Styrofoam tiers all 360 degrees around the cake!
Felt Letter Boards
Felt letter boards have horizontal grooves designed to hold plastic letters. It turns out those soft felt grooves are also ideal for holding pin posts! You can spell out your favorite movie quotes, motivational mantras, or song lyrics across the board while clustering matching pins directly alongside the words.
Soft Furnishings, Lampshades, and Mannequins
Enamel pins can easily be incorporated into home soft furnishings. Pinning accents onto decorative throw pillows (placed safely on side chairs where heads won’t rest on them), structured fabric lampshades, or vintage dressmaker mannequins creates rich, unexpected decorative flair throughout your home.
6. Clever DIY Hacks and Renter-Friendly Display Systems
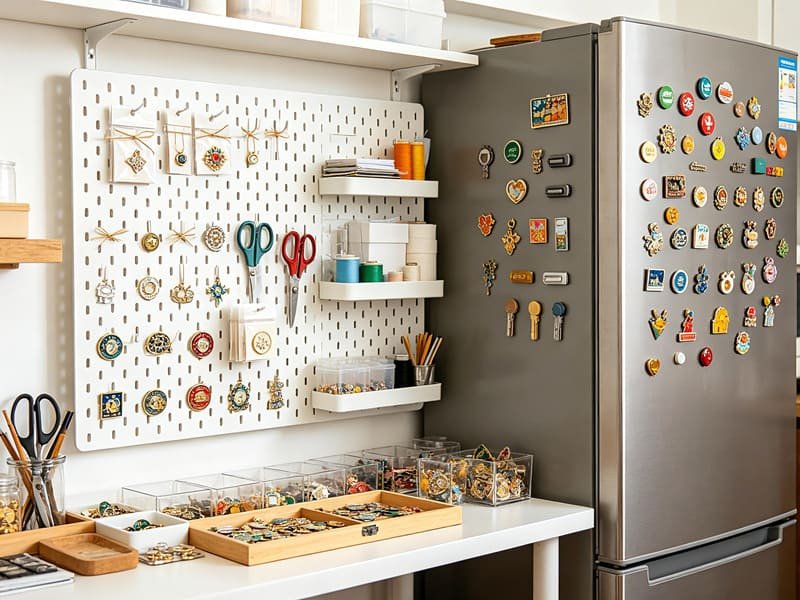
Living in a rental apartment often means you cannot hammer dozens of nails into the drywall. Fortunately, several brilliant DIY hacks let you build sturdy, renter-friendly displays without damaging your walls or your pins.
The Pegboard Wall Display Hack (FactoryPin Method)
Metal and wooden workshop pegboards are fantastic for modular wall storage, but their pre-drilled holes are usually too wide for standard pin clutches. Here is the ingenious zip-tie hack to solve this alignment challenge:
- Loop a small plastic zip-tie through one of the pegboard holes and pull it lightly to form a small loop on the front side of the board.
- Push your pin post through a small strip of heavy cardstock, insert the post through the zip-tie loop, and snap the backing clutch on tightly.
- Place a tiny neodymium magnet behind the cardstock strip against the pegboard. The magnet balances the weight and keeps the pin from tilting forward, giving you a rock-solid, fully adjustable pegboard gallery!
The Magnetic Fridge & Whiteboard Conversion
If you want to enjoy your pins in the kitchen or office without piercing any surfaces, convert them into high-strength magnets. Simply remove the standard rubber clutch and slide a flat magnetic pin back (such as a deluxe magnetic locking adapter) over the post. You can now stick your entire collection to refrigerators, metal file cabinets, magnetic memo boards, or walls painted with magnetic primer.
Translucent Enamel Window Suction-Cup Displays
Pins crafted with translucent or transparent enamel look like miniature stained-glass windows when light passes through them. Instead of mounting them against an opaque board, press 25mm mushroom-head rubber suction cups onto a clean glass window or sliding patio door. Push the pin post into the rubber suction stem. When the morning sun shines through, your pins will glow with radiant, jewel-like colors!
Repurposed Typesetter & Printer Trays
Vintage wooden typesetter drawers and printer trays feature dozens of tiny, distinct compartments. By lining each cubby with a small square of felt or cork, you create a rustic, vintage shadow display where each individual pin enjoys its own dedicated compartment.
7. Wearable Showcases: Taking Your Collection on the Road

While wall displays are wonderful for home enjoyment, wearing your pins lets you express your personality, start conversations, and share your passions with the world wherever you go.
Denim Jackets, Vests, and Outerwear
Heavyweight denim is the ultimate canvas for enamel pins. The dense weave easily supports the weight of metal pins without tearing or sagging:
- Collar Points: Place matching pairs of smaller pins on the left and right collar tips for subtle, symmetrical flair.
- Lapels & Pocket Flaps: Use the chest pocket flaps and upper lapels for medium-sized statement pieces.
- The Back Panel Constellation: Dedicate the large back panel of a jean jacket to a massive, sprawling constellation of themed pins surrounding a central embroidered back patch.
- Wearable Rule: Always replace rubber backs with push/pull locking pin clasps when wearing pins on jackets to prevent them from snagging on seatbelts or backpack straps and falling off!
Bags, Backpacks, and Clear-Window “Ita-Bags”
Canvas tote bags and school backpacks are everyday favorites for pin placement. However, standard backpacks expose pins to rain, scraping against bus seats, and crowd friction. If you want to carry rare pins on your bag without risking damage, use a collector display bag (commonly known as an ita-bag). These bags feature a dedicated fabric insert inside an exterior clear vinyl window compartment. Your pins remain completely visible to everyone, but they are fully sealed behind protective vinyl away from weather, dirt, and prying fingers.
Headwear & Daily Accessories
A single accent pin on the folded cuff of a knit beanie, the side crown of a baseball cap, or the band of a fedora makes a tasteful, understated statement. You can also attach pins to neck scarves, canvas sneaker laces, pencil cases, or convention lanyards.
Professional Attire & Etiquette
Wearing pins in business or formal environments adds a refined personal touch when done correctly. For blazers and suit jackets, tradition dictates placing the pin on the left lapel just below the collar notch. According to the United States Flag Code, American flag pins and national emblems must always be worn on the left lapel, positioned closest to the heart. When wearing pins on fine silk or thin dress shirts, use magnetic backings to avoid leaving visible holes in delicate weave fibers.
8. Portable Storage & Trading Systems for Collectors
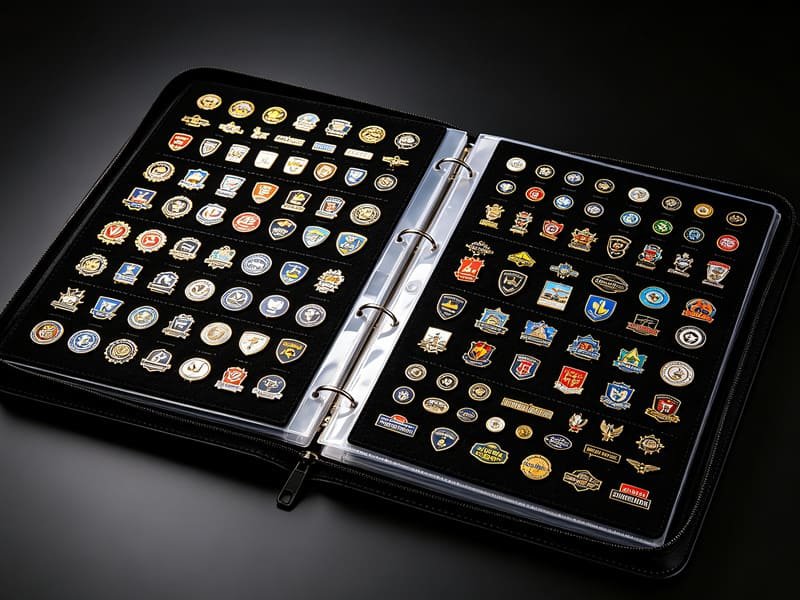
If you attend conventions, trade events, or Disney pin trading meets, you need a display solution that is lightweight, organized, and built for travel. Wall boards cannot travel easily, but dedicated trading books bridge the gap between dynamic display and safe transport.
Pin Books & Collector Binders
Pin books are binders fitted with specialized pages made of high-density foam, heavy felt, or perforated plastic. You push your pins into the pages and secure their backings on the reverse side. Crucially, quality pin books include soft, transparent intervening divider sheets between pages. These dividers prevent pins on opposing pages from rubbing against each other and scratching their metal platings when the album is closed.
Zippered Trading Bags
Specialized pin trading bags feature durable shoulder straps, exterior pockets for spare clutches, and multiple removable zippered felt pages. They allow you to flip through your collection like a photo album at trade tables, providing effortless viewing while keeping your valuable inventory secure.
Hard-Shell Padded Travel Cases
For oversized 3D cast pieces, heavy FiGPiNs with built-in kickstands, or vintage antique pins, hard-shell aluminum or polymer travel cases lined with pre-cut pick-and-pluck foam deliver maximum impact protection during flights and cross-country transit.
9. Matching Pin Styles to the Perfect Display Medium
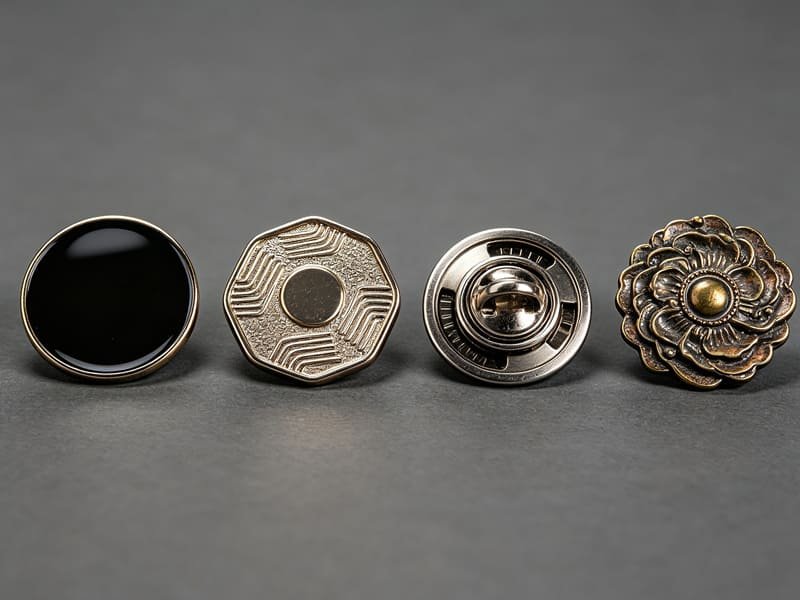
Not all enamel pins are created equal. The manufacturing method, surface finish, and mechanical features of a pin determine which display environment will showcase it best while preserving its structural integrity.
Hard Enamel Pins
Hard enamel pins are polished completely flat until the metal line work and colored enamel sit at the exact same height. They possess a smooth, glossy, jewelry-like finish. Because of their lustrous, formal appearance, hard enamel pins look exceptional inside double-matted frames, velvet-lined shadow boxes, and on professional suit lapels.
Soft Enamel Pins
Soft enamel pins feature recessed enamel colors surrounded by raised metal borders, giving them a distinct textured, three-dimensional feel. They are vibrant and playful, often incorporating specialty finishes like glitter, rainbow anodized metal, or glow-in-the-dark enamel. Soft enamel pins shine brightest on textured corkboards, hanging canvas banners, and denim jackets.
Specialty & Interactive Pins
- Spinner & Slider Pins: These pins feature moving mechanical parts. Display them in accessible locations—such as desktop stands, corkboards, or jacket lapels—where you and your guests can interact with them easily. Placing them tightly behind flat picture frame glass prevents the mechanism from spinning.
- Heavy 3D Cast & FiGPiNs: Large, weighty pins require reinforced foam core backings, kickstand bases, or deep shadow boxes to prevent them from leaning forward under their own weight.
- Printed & Photo Dome Pins: Featuring delicate offset screen printing coated under a clear epoxy dome, these pins are best kept inside enclosed glass frames to protect the clear epoxy from surface scratching.
| Pin Manufacturing Type | Surface Characteristics | Recommended Display Method | Optimal Backing Hardware | Enclosure Recommendation |
|---|---|---|---|---|
| Hard Enamel | Smooth, flat-polished, glossy | Shadow boxes, Matted frames, Blazers | Rubber clutch / Deluxe lock | Glass frame or open board |
| Soft Enamel | Textured, recessed, raised metal | Corkboards, Canvas banners, Denim | Rubber clutch / Push-pull lock | Open canvas or wall board |
| Spinner / Interactive | Moving components, multi-layer | Desktop stands, Lapels, Open boards | Dual rubber clutches | Open access (No tight glass) |
| Heavy 3D Cast / FiGPiN | Thick relief, heavy metal weight | Deep shadow boxes, Desk kickstands | Reinforced dual posts / Stands | Deep shadow box recommended |
| Printed / Epoxy Dome | Flat graphics under resin layer | Framed displays, Collector albums | Rubber clutch | Protected glass enclosure |
| Translucent / Stained Glass | Semi-transparent colored resin | Window suction cups, LED backlighting | Suction-cup stem / Rubber clutch | Backlit or natural light window |
10. Curating and Organizing Your Collection Like an Art Gallery
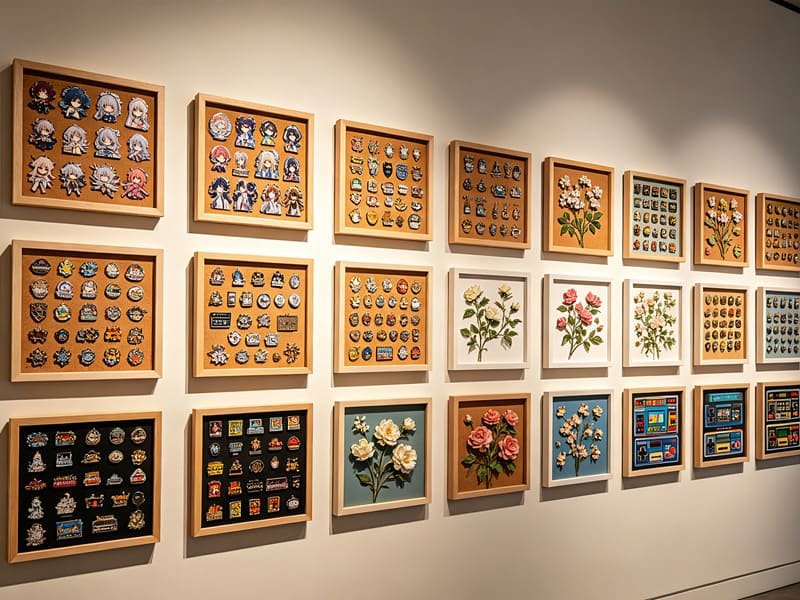
As your pin collection expands, simply sticking pins randomly onto a board can result in visual clutter. Curating your collection with intentional organization transforms scattered badges into a cohesive art gallery.
Categorizing by Theme and Motif
Grouping pins by subject matter creates strong narrative focal points:
- Gaming & Anime: Mount pixel art and gaming pins against retro grid backgrounds or synthwave-styled boards.
- Pop Culture & Music: Cluster concert badges, iconic logos, and music pins inside a dedicated black frame, pairing them with concert ticket stubs and guitar picks.
- Botanicals & Wildlife: Display floral, plant, and animal pins on raw linen fabric or unpainted natural wood frames.
- Culinary & Coffee: Mount food, dessert, and coffee pins on a wooden kitchen cutting board hung on the wall.
- Labor Unions & Trade Badges: Display vocational pins (such as IBEW or trade union emblems) on heavy-duty duck canvas banners alongside official patches.
Color Spectrum and Chromatic Gradients
Arranging your pins in a rainbow color spectrum creates instant visual harmony. Start with red pins on the far left, transitioning smoothly through orange, yellow, green, blue, purple, and ending with black and silver on the right. Alternatively, high-contrast monochrome groupings (like an all black-and-gold board or a bold black-and-red board) make powerful design statements.
Chronological Collector Timelines
Arranging your collection chronologically tells the story of your personal journey. Place your very first childhood pin at the top left, mapping subsequent pins across the board in the order you collected them. This layout works wonderfully for annual convention badges, milestone achievements, and travel souvenirs.
Seasonal Display Rotations
Instead of trying to display every pin you own all year round, rotate your boards to match the seasons! Rotating keeps your home decor fresh and gives every piece its moment in the spotlight:
| Season | Suggested Pin Themes | Recommended Backdrop Color | Complementary Accents |
|---|---|---|---|
| Spring | Pastels, Floral botanicals, Easter, Wildlife | Light Sage Green / Soft Pink | Pressed flowers & linen ribbons |
| Summer | Beach, Tropical, Travel souvenir maps, Disney | Crisp White / Nautical Navy | Postcards & travel tickets |
| Autumn | Halloween, Pumpkins, Occult, Cozy coffee | Warm Mustard / Rustic Burlap | Faux autumn leaves & twine |
| Winter | Holiday snowflakes, Gold enamel, Celestial | Deep Midnight Blue / Black Velvet | Micro fairy lights & silver mats |
11. Merchandising and Commercial Display Solutions for Brands and Events

For artists, brand managers, non-profit organizers, and independent shop owners, displaying enamel pins is not just about home aesthetics—it directly drives brand recognition and merchandise sales.
Point-of-Sale (POS) Countertop Displays
Because enamel pins are compact and affordable, they make extraordinary impulse-buy items at checkout counters. Utilizing rotating wire spinner racks, tiered clear acrylic stair risers, or branded wooden pegboards allows customers to browse designs easily. Pairing every pin with a thick, beautifully designed custom backer card communicates quality and increases the perceived value of your merchandise.
E-Commerce Product Photography Setups
When selling pins online, clean display staging makes all the difference. Photograph pins flat on textured linen, pinned to stylish denim jackets, or staged on clean wooden blocks under diffused studio lighting. Tilting the pin slightly toward the light captures the brilliant shine of polished metal borders without causing harsh reflections on camera.
Trade Show & Convention Booth Displays
When setting up convention booths at busy trade shows, your display must be highly visible yet quick to pack up. Lightweight vertical canvas banners, lockable tabletop shadow boxes, and magnetic display boards allow you to build an impressive booth in minutes while keeping your stock safe from accidental damage.
12. Archival Care, Cleaning, and Long-Term Preservation
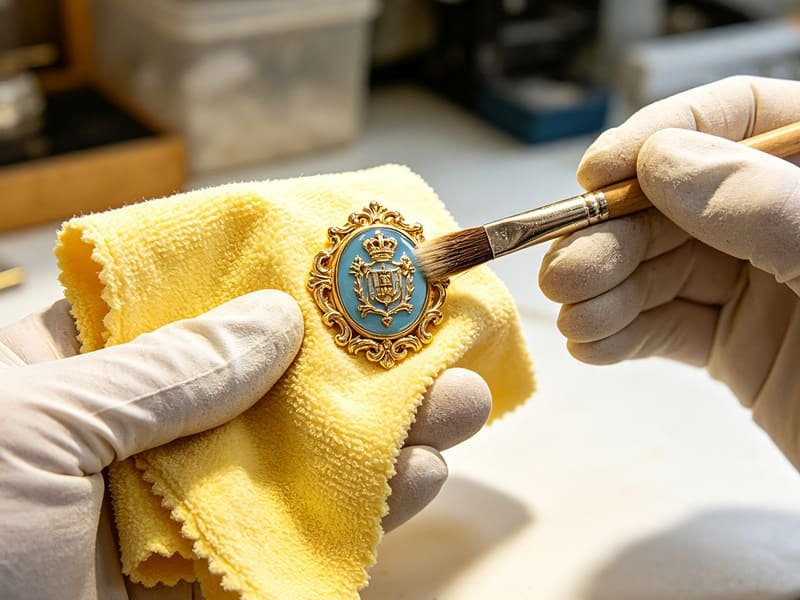
Even the most stunning display setup will not help if your pins suffer from environmental damage. Enamel pins are durable, but their metal platings, enamel colors, and clear epoxy coatings can degrade if exposed to moisture, intense sunlight, or harsh chemicals.
Shielding Pins from Ultraviolet (UV) Fading
Prolonged exposure to direct sunlight and UV radiation is the number one enemy of vibrant enamel colors. Over time, UV rays will bleach brightly colored pigments and cause clear epoxy coatings to turn brittle and yellow. Always position your wall boards and shadow boxes away from direct, south-facing windows. If mounting rare pins in sunny rooms, invest in shadow boxes equipped with UV-filtering conservation glass.
Moisture Control & Oxidation Defense
High relative humidity causes base metals and electroplated finishes to oxidize, tarnish, and rust. Keep your pin displays in climate-controlled rooms, and avoid humid environments like bathrooms or damp basements. When storing pins inside enclosed shadow boxes or sealed display cases, drop a small silica gel desiccant packet into the corner of the frame to absorb ambient moisture.
Proper Cleaning Protocols
- Regular Dusting: Use a dry, soft-bristled makeup brush or camera lens blower to gently sweep away dust from the crevices around raised metal lines.
- Polishing Metal & Enamel: Wipe surfaces with a clean, dry microfiber cloth (the same kind used for eyeglasses). Never use abrasive scrubbers or harsh chemical jewelry dips, as they can strip the delicate electroplated gold or black nickel coating right off the metal base.
- Removing Grime: If a pin accumulates oily fingerprints or sticky residue, dampen a microfiber cloth with lukewarm water and a drop of mild dish soap, wipe gently, and dry completely with a clean towel immediately.
Safe Storage for Backup Collections
When pins are not on active display, never leave them rattling loose inside a drawer where metal pins can scratch each other’s faces. Store backup pins flat inside felt-lined collector books or wrap them individually in soft acid-free glassine paper pouches.
13. Frequently Asked Questions
Q1: How do I display enamel pins without damaging walls or furniture?
Direct Answer: You can display enamel pins without wall damage by using hanging canvas banners on single adhesive hooks, freestanding tabletop acrylic stands, felt letter boards on desks, or converting pins to magnets for refrigerator surfaces.
Hanging fabric banners require only a single removable command hook, eliminating the need for nails or screws. For desks, bi-fold photo frames and wooden risers stand on their own without any wall mounting.
Q2: How do I display enamel pins on clothing without ruining the fabric?
Direct Answer: To protect delicate fabrics, use magnetic locking pin backs to eliminate punctures entirely, attach pins through existing buttonholes or thick seam allowances, and slide a felt buffer disc over the post to distribute weight.
Magnetic clutches hold the pin securely on opposite sides of the cloth without piercing fibers. On sturdy fabrics like denim or canvas, piercing will not cause damage, but lightweight silk and satin should always use magnetic attachments.
Q3: What is the best way to display a very large enamel pin collection?
Direct Answer: Large collections containing dozens or hundreds of pins are best displayed on expansive Stick’N’Go® wall panels, grouped framed corkboards, lightweight wall tapestries, or multi-page felt collector binders.
Combining multiple matching corkboards into a wall grid gives you unlimited expandable space. For collectors who also travel, multi-page felt albums store hundreds of pins compactly without taking up wall space.
Q4: How do I keep enamel pins from falling off backpacks and jackets?
Direct Answer: Replace standard rubber or butterfly clutches with push/pull deluxe locking pin backs or screw-lock backings.
Standard rubber clutches can easily pull loose when brushed against crowds, chairs, or car doors. Push/pull locking clasps grip the post with an internal spring lock that cannot release until you intentionally lift the top release cap.
Q5: How do I display enamel pins on a workshop pegboard?
Direct Answer: Loop small plastic zip-ties through the pegboard holes, mount the pin through a strip of cardstock, and anchor it with a small balancing magnet behind the board.
Because standard pegboard holes are too large for pin backs, zip-tie loops provide a secure anchor point while cardstock strips and counter-weight magnets prevent the pins from drooping forward.
Q6: How do I prevent enamel pins from fading or tarnishing over time?
Direct Answer: Keep displays out of direct sunlight, store pins in climate-controlled rooms with silica gel packs, and dust them regularly with dry microfiber cloths.
Direct UV rays cause colored enamel pigments to fade and epoxy resin coatings to yellow. High humidity causes electroplated metal to tarnish, which can be prevented by maintaining a dry environment and using UV-protective glass frames.
Q7: What is the difference between hard and soft enamel pin display requirements?
Direct Answer: Hard enamel pins have smooth, flat polished surfaces ideal for formal blazers, matted art frames, and glass shadow boxes, whereas textured soft enamel pins look best on casual denim, canvas banners, and corkboards.
Hard enamel has a jewelry-grade sheen that benefits from museum-style glass enclosures, while soft enamel’s recessed metal edges and vibrant novelty finishes pop against textured fabric and cork surfaces.
Q8: Can I display enamel pins on glass windows and mirrors?
Direct Answer: Yes, you can display pins on glass windows and mirrors by pressing 25mm mushroom-head suction cups onto the clean glass and inserting the pin post into the suction stem.
This technique is especially breathtaking for pins crafted with translucent or transparent enamel, as sunlight passes through the colors like a miniature stained-glass window.
Q9: How should I organize pins if I have multiple unrelated fandoms?
Direct Answer: Divide unrelated fandoms across separate modular display hoops, themed shadow boxes, or distinct corkboard tiles, organizing each board by color gradient or genre.
Grouping pins by theme (e.g., one hoop for botanical plants, one frame for gaming pins, and one banner for travel souvenirs) maintains clean visual harmony while letting each interest shine individually.
Conclusion: Bringing Your Collection into the Spotlight
Every enamel pin in your collection represents a spark of creativity, a cherished memory, or a personal passion. Whether you choose to craft a quick ten-minute photo frame display, hang a charming no-sew embroidery hoop, curate a museum-grade illuminated shadow box, or sport a denim jacket covered in custom art, displaying your pins properly turns your hobby into a daily source of inspiration.
Remember that the finest displays always begin with exceptional craftsmanship. When pins are forged with durable base metals, vibrant color enamels, and precision polishing, they hold their brilliant luster for decades to come. If you are an artist planning your next collection, a brand looking to elevate your promotional merchandise, or an organization celebrating a major milestone, partnering with an experienced manufacturing specialist ensures your vision is brought to life with true museum-grade quality.
To design your own premium custom soft enamel, hard enamel, 3D cast, or spinner pins with factory-direct precision and free artwork assistance, explore the custom crafting options at Enamel Lapel Pins Factory.